Thursday, 31 August 2017

Day 194: Vietnam and Fried Tilapia with Green Mango


Good evening, Raffies!

Today we are going to Vietnam and enjoying a very simple, but delicious dish: fried tilapia with green mango, in Vietnamese Cá rô phi chiên giòn chấm mắm xoài xanh.
I have always thought the Vietnamese was really fascinating, because of its strong French influence in its dishes. Vietnam used to be a French colony and its cuisine evolved with a French note. If you think about the puff pastry chicken pies, raw fish and chips, or French fries, crêpes with pork and prawns and baguettes. All the richness of French cuisine with an Asian flair.

Since it has been a while since our last fish, I decided to go for a really easy and simple dish for Vietnam. Secretly, I also wanted to practice my mango-papaya chopping skills :)

The recipe is taken from "My Vietnamese Kitchen" by Uyen Luu:

1 tbsp vegetable oil
1 whole red tilapia (any other fish might also work, like sole, nile perch, red snapper, etc.)
1 unripe green mango, julienned (I used 2, because they were very small)
2 tbsp cider vinegar
2 tbsp sugar
2 tbsp fish sauce
2 garlic cloves, finely chopped
2 chillies, chopped

Heat the oil in a pan and fry the fish until crispy brown. Approximately 10 minutes on each side.
Mix the ingredients for the dressing in a bowl - the vinegar, sugar, fish sauce, garlic and chillies. Place the mango on a plate. Arrange the fish on top of the mango and drizzle with the sauce.
Serve with rice. Enjoy!


Our tilapia just happened to be filets instead of a whole..well, you can't have everything, right?
The green mango combined wonderfully with the fried fish and we accompanied it with some nice white rice. Delicious!

Love,

Raffi

Wednesday, 30 August 2017

Day 193: Venezuela and Pan de Jamón


Hola, Raffies!

Get out your candles and Christmas decoration! Only 117 days left! Time for a Christmas dinner, right?
We are going to Venezuela and we are going to enjoy a typical Christmas dinner: Pan de jamón. This is a lovely calzone-like dough, rolled up and filled with ham and bacon. For the vegetarians among you, you can skip the meat frenzy and go for a version with cheese and vegetables. Both are totally worth trying!

For my recipe I found "La Cocina de Gisele", who gives some valuable tips for the preparation:

500g flour
1 spoon fresh yeast
100g butter at room temperature
2 eggs
100g sugar
1 tsp salt
1/4 l milk, lukewarm
200g bacon, sliced
500g ham, sliced
100g olives, sliced
75g papelón or panela (unrefined whole cane sugar)
raisins

In a cup of water, melt the yeast and mix. Leave to rest for about 5 minutes. In a bowl, mix the milk with the salt and sugar.
On a working surface, place the flour and make a volcano shape with a dent in the middle. Pour the yeast into the dent. Mix with your hands. Add the eggs, the butter and the milk and work well with your hands. If the dough is very sticky, add some more flour. Make a ball and place it into a bowl. Leave it to rest for at least 35 minutes. You can place it into the oven without turning it on and by placing a glass of warm water next to your dough. Remember to cover the dough.
In the recipe, they advice you to get your work done or tend to the chores of the household while you are waiting to the dough :)
Soak the raisins in water and, on a floured working surface, roll out the dough into a square of about 0.5 cm thickness. With this amount of dough you'll end up making 3 medium breads or one really big one.
Place the ham and bacon on your square. Add the raisins and olives and roll it up. Again, the recipe suggests to put little filling in, if you are planning to sell it, but a lot if you are going to enjoy with your friends and family :)
Close the ends with your fingers and bake at 180°C for 20 minutes. Now brush it with the panela and some egg (otherwise just egg works fine too) and bake for another 40 minutes until nice and crispy brown. Enjoy your Christmas!

If you want the vegetarian version, just replace the ham and bacon with cheese, spinach, onions, leek and mushrooms.


It was great! The dough was soft and slightly sweet. It worked really well with the ham!

Love,

Raffi

Tuesday, 29 August 2017

Day 192: Vatican City and Torta alla Ricotta


Buonasera, Raffies!

We are going to the smallest country in the world, the Vatican and we are going to have our last dessert in this challenge..but fear not! There will be more desserts coming your way after the challenge is over ;)

I know the Vatican does not exactly have a different cuisine from the rest of Italy, however the cuisine of Rome and Lazio, the region in which Rome is, have a quite peculiar cuisine. Maybe spaghetti alla carbonara ring a bell ;) They are typical for Lazio and Rome to be precise. The cuisine there is quite heavy - we'll be having more dishes coming soon!

Anyway, today's cake is typical for Southern Italy. It seems that versions of this cake already existed in Roman times, although this could be just a legend. The actual place of birth of this cake is not entirely certain, either Lucania, Irpinia or Sannio - which is the one we are going for today. There are a lot of different versions of this cake too. Sometimes you can find it as a dry cake, sometimes like a pie or something resembling the American cheesecake.

We are going to make a very simple, yet delicious cake that strangely enough I did not enjoy as a kid. We are making Torta alla Ricotta. It is a simple cake with ricotta and chocolate drops. I prefer the creamy version of it compared to the dry cake..
The trick to getting a creamy cake is cooking it at the right temperature and for a short period of time, to prevent the cake from drying out.

So, here it goes:

250 g ricotta
250 g flour
3 eggs
180 g sugar
50 ml milk
1 package backing powder
1 package vanilla sugar
30 g chocolate drops

To get the best result, make sure to keep the ricotta, milk and eggs out of the fridge for about an hour, before starting.
In a bowl, mix the ricotta with the sugar, until is it creamy. Add the eggs one by one and keep on stirring. Now it is time to add the flour, vanilla sugar and backing powder. Mix well and add the milk.
Before adding the chocolate drops, dip them into some flour. This will prevent them from falling to the bottom of the cake and will keep their shape intact.
Stir everything and pour the dough into a baking form.
Bake in a preheated oven at 180° C for 30 minutes. Check it the cake is done with a toothpick. The inside should be cooked but still creamy. Serve and enjoy!


What do you think of this cake? Would you like a slice?


Love, Raffi

Monday, 28 August 2017

Day 191: Vanuatu and Laplap


Good evening, Raffies!

It is wonderful and warm here in the Netherlands and I wish it would never stop. We are going to Vanuatu in our last week of this challenge and we are going to make a funny sounding dish: Laplap.

Laplap is the national dish of Vanuatu and it is prepared by grating or pounding taro, breadfruit or yam, mixing it with taro leaves or spinach. The gooey dough you get is cooked between banana leaves in an underground oven or a normal oven if you are making it in your kitchen. You cook it in a coconut cream with some nice meat, like chicken, beef, pork or flying fox - if you happen to have some left. Since I had used up all the flying fox, I fell back on some plain chicken.

It is actually quite easy to make at home and the recipe simply requires some god time management:

1. The Base

2 squares of banana leaves
3 c grated taro
1/2 c coconut milk
1 c cooked spinach or taro leaves, chopped
4 cherry tomatoes, quartered
salt
pepper

2. For the Chicken

1/2 chicken
1 lime, juice
1 tbsp coconut oil
1 tsp turmeric powder
1 tbsp curry powder
1 tsp chili flakes
salt

3. Coconut Sauce

1 tsp coconut oil
3 cloves garlic, crushed
1 1/2 tbsp ginger, sliced
1 lime leaves
1/4 c flour
1 c coconut milk
1 chili, sliced
1/4 c chopped spring onions
salt
pepper


Start by preheating your oven at 190° C.
Soften your banana leaves in hot water for a few minutes.
Oil an oven dish and lay one leaf in it. Mix the taro with the coconut milk and spread it on the banana leaf. It should be approximately 5 cm thick and evenly spread out. Place the spinach into the centre of the taro mix. Place the tomatoes around the taro mixture. Season with salt and pepper and cover with the second banana leaf.

It is time to make the chicken. In a mixing bowl, mix all the ingredients for the chicken. Add the chicken and mix well, so that the chicken is covered with the sauce. Place the chicken into a baking form and bake with the taro mixture for about 1 hour. 20 minutes before being ready, remove the leaf from the taro mix.

While you are waiting, make the coconut sauce. in a frying pan, heat the coconut oil and stir-fry the garlic and ginger. Add the lime leaves and the flour. Mix well and cook until the flour has turned slightly red. Add the coconut milk and the chili and spring onion. Mix well and leave it to simmer. It should be slightly thick.

Cut the chicken and place it on the taro cake. Pour the coconut sauce on top and serve immediately. Enjoy!


My absolute favourite in this dish was the chicken! It was great! The whole Laplap was delightful, but the chicken was simply out of this world!

Love,

Raffi

Sunday, 27 August 2017

Day 190: Uzbekistan and Chuchvara


Hello, Raffies!

We are in our last week of this world food challenge!
Today we went to the cinema and watched the Dark Tower. During my teenage years, I had my Stephen King phase and I read all of his books, including the series of the Dark Tower. I must say that a rough two hours of film do not do those books justice, but that is just my opinion.

Well, back to today's dish..We are going to Uzbekistan and we are going to enjoy our last dumplings of this challenge. One last time, rolling out dough, folding dumplings and enjoying their lovely flavour.

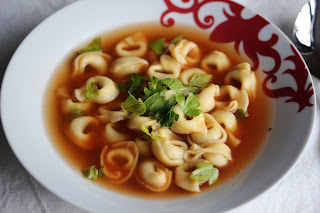
We are making Chuchvara, a typical Uzbek dumpling recipe with soup. Other versions serve them with sour milk or fried with onions. Often, if you have leftovers, you'll just recycle them by frying them with butter and onions.

Today's recipe requires very little ingredients:

250 g flour
250 g ground mutton
200 g onions, thinly chopped
1 egg
salt
pepper

Mix the meat with the onions and add salt and pepper.
On a working surface, mix the ingredients for the dough - flour and egg and work it well until smooth. Roll out to 1-2 mm and cut out 5cm*5cm squares. Put a teaspoon of filling in each square and fold corner-to-corner. Make a half-moon shape and bring the edges together (like tortellini). Boil in boiling water, until they reach the surface. Serve and enjoy!


I served them in soup. For the soup, bring 1 litre of water to a boil, add 1 bouillon cube, salt, pepper, paprika, tomato paste, chili and coriander. Garnish with fresh parsley.

What can I say..what is there not to like about dumplings? :)

Love,

Raffi

Saturday, 26 August 2017

Day 189: Uruguay and Chivito


Buenas tardes, Raffies!

Today we are going to Uruguay and we are going to enjoy its national dish: Chivito.
It is a sandwich with churrasco (filet mignon), bacon, ham, egg, mozzarella, tomatoes and salad. Usually, accompanied by chips as a side dish. It is incredibly filling! The filling of the sandwich can have as many variations as you like. You can add cucumbers, pickles, more meat, onions and much more.

The name comes from Chivo, which means goat, since the first sandwich contained goat meat, as the legend tells.

In my version, I used halal ham and bacon, since I tend to get a horrible allergic reaction to pork and therefore try to avoid it as much as possible. But I found great turkey ham and some horse bacon!

The recipe is really simple. Here is what I used for my version:

2 buns
2 slices of churrasco, filet mignon
2 slices of bacon
2 slices of ham
2 eggs, fried or boiled
mayonnaise
2 slices of salad
1 tomato, slices
2 mozzarella slices
chips

I started by making my mayonnaise at home like I always do. Just mix an egg yolk with a bit of lemon juice, 1 tbsp Dijon mustard, salt and olive oil until thick. I usually mix all the ingredients without the olive oil first with a fork and then gradually add the olive oil, until I have the needed amount.

Heat your bread in the oven. Half it and spread the mayonnaise on one half. Add all the ingredients and serve with your chips. Enjoy!


This sandwich was first invented in 1940 by AntonioCarbonaro, a restaurant owner in Punta del Este. Similar variations of this sandwich also exist in Argentina, Paraguay and Bolivia, called lomito and in Brasil you have the baurú.
It is a great idea for a quick meal or whenever you need to pack something for a heavy lunch. My husband obviously loved it! :)


Love,

Raffi

Friday, 25 August 2017

Day 188: United States of America and Poyha


Good evening, Raffies!

Today we are going to the USA! Finding a recipe for this country was a challenge. I decided to search for something from the Native Americans and I found Poyha.

It is an ancient Native American meatloaf with corn, cornmeal, grapes, meat and bacon.
Usually, minced meat of buffalo, elk or turkey are used. We went with turkey, because unfortunately we could not find any buffalo or elk.

The recipe is simple:

500 g ground elk or buffalo or turkey (beef also works)
2 tbsp oil
3 slices bacon, chopped
1 can corn
1 c seedless crapes, chopped
1 onion, chopped
2 eggs
1 c cornmeal
1 tsp parpika
1/s tsp garlic salt
salt and pepper

Start by blending the corn in a blender or food processor. Now join the corn, grapes, onion, eggs in a bowl. Mix until the eggs are well mixed in. Add paprika, garlic salt and pepper.
In a pan, fry the bacon and minced meat, until brown.
Heat the oven to 180 ° C.
Add the meat and bacon to the mixture in the bowl. Now pour the cornmeal a bit at the time into the mixture and mix well. Use your hands to mix it better.
It has to be moist, but not runny.
Pour in a Dutch oven or a baking form, cover and bake for 45 minutes.
Leave it to cool down for about 15 minutes, slice and serve.
Serve with ketchup, gravy or salsa. Enjoy!


As a fan of cornmeal, I enjoyed the recipe and would very much love to learn about the Native American cuisine.

Love,

Raffi

Thursday, 24 August 2017

Day 187: United Kingdom and Steak & Ale Pie


Good evening, Raffies!

Today we are going to the UK! I had a few recipes I knew for tonight. However, I have decided to go the extra mile and make something with the one ingredient I do not like: Beer.
Yes, I know, it might seem weird, but me as a German does not like beer. So here is tonight's recipe: Steak and Ale Pie.

It is a traditional British pie with steak and beef gravy. You can add vegetables like carrots, potatoes and peas into the filling and cover up everything with a nice puff pastry dough.

Usually it is served with salt and vinegar. The quantities vary from person to person. The steak and ale pie is also found in Ireland, where Guinness is used as ale and it even came all the way down under, to Australia and New Zealand. So here comes tonight's pie.

The recipe is quite simple:

1 tbsp oil
500 g braising steak, cut in stripes
1 clove of garlic, crushed
1 onion, chopped
1 carrot, sliced
250 ml strong ale
1 beef bouillon cube
1/2 tsp chili powder
2 tsp thyme
300 g ready puff pastry (2 packages)
1 egg, slightly beaten
pepper
salt

Heat the oil in a pan and fry the onion and garlic for a minute. Add the steak and cook for a few minutes, until no pink spots are visible anymore. Now add the carrots and pour the ale into the pan. Now you can also add more vegetables, if you would like to, like potatoes, mushrooms, peas..
Add the chili, thyme and bouillon. Salt and pepper to your liking.
Now put the mixture into a casserole and if the liquid does not cover the meat and vegetables, add some water. Cook on low heat for approximately 1.5 hours. (I myself used a pressure pot to speed things up).
Now roll out the puff pastry dough and either you make one big pie, or small pies for each. Heat the oven at 180° C.
Pour the filling into the dough and cover with the second dough. Poke a few holes into the pie and brush with the egg. Bake for 20 minutes.
Serve and be careful not to burn yourself with the filling! Enjoy!


I must say that although I do not like beer and that I could taste the flavour of the ale, I enjoyed the pie! My husband loved it and ate more than half of it!


Love,

Raffi

Wednesday, 23 August 2017

Day 186: United Arab Emirates and Machboos


Good evening, Raffies!

Today we are going to the United Arab Emirate, we are going to enjoy some traditional food in a tent, while comfortably leaning against a cushion. We are going to make Machboos.

You might remember it from Qatar and its chicken Machboos. Today we are going for the version from the Emirates. Surprisingly enough, the flavour was not the same.

Machboos or Machbous is known as the national dish of the Emirates. Although it can be found in all Arab countries, the regional differences always make it taste slightly different. The spices are just amazing!

The recipe is simple, although it requires a bit of patience. It will totally be worth waiting for!

2 c water
2 chicken bouillon cubes
1 tbsp olive oil
4 chicken pieces
1 dried lime
1/8 tsp saffron
1 onion, chopped
1 tomato, chopped
1 clove of garlic, crushed
1/2 tsp cinnamon powder
1 tsp turmeric powder
1 tsp cumin powder
1 tsp curry powder
1/2 tsp cayenne pepper
1 tsp salt
2 c basmati rice

Preheat your oven at 180°C. Take out a baking dish and grease it with olive oil.
In a pot, boil the water. Add the chicken bouillon, dried lime, saffron and cook, until the bouillon cubes are dissolved. set aside and keep warm.
Rub the chicken in half of the spices. Heat the olive oil in a skillet and fry the chicken until brown.
Remove the chicken from the skillet and set aside.
In the same skillet, fry the onion for a couple of minutes. Add the tomatoes, garlic and the other half of the spices. Now add the rice and stir well. Cook for a few seconds and remove from heat.
Spread the rice mixture on the baking dish. Add the chicken and pour in the broth you had kept aside. Tuck in the dried limes too.
Cover with tin foil and bake in the oven for 45 minutes. Do not remove the tin foil until the end.
Place on a big serving plate and eat out of the plate together with everyone else and use your RIGHT hand. Enjoy!


Obviously we ate with our hands and it was amazing!

Love,

Raffi

Tuesday, 22 August 2017

Day 185: Ukraine and Verenyky


добрий вечір (dobryy vechir), Raffies!

Today we are going to Ukraine and we are back to rolling out dumplings! We are making a very famous starter: Varenyky.

Unfortunately for us, this starter is more than enough for a whole meal. Guess we still need some training to have a chance in against the Ukrainians ;)
These dumplings can be found in all of Western Europe. You might have heard of them by the name of Pierogi. Every country has different fillings and calls them by their local names, but the principle behind it is the same. A dough with a filling, boiled in hot salty water.

For our recipe today, we are going for one of the traditional Ukrainian fillings: potatoes and mushrooms! Also common is potatoes and sauerkraut or potatoes and cream cheese.

The recipe is simple, just the rolling out takes some time:

For the dough

3 c flour
220 g sour cream
4 tbsp butter, softened
1 egg

For the filling

4 large potatoes, peeled and cut in big chunks
250 g mushrooms, sliced
1 clove of garlic, crushed
1 onion, chopped
3 tbsp sunflower oil

In a bowl, mix the flour, sour cream and butter. Scramble the egg in a separate bowl and mix with 3/4 c of water and mix again. Add the egg to the flour. Add the egg to the mixture. With the help of a mixer, mix and fold the dough well. Keep on mixing until you can for a ball. If it is still sticky, just add a bit more flour. Now cover the bowl with the ball of dough inside it with a cloth.

Proceed with the filling while your dough is resting.

Boil the potatoes in hot water until soft. Mash the potatoes and set them aside to cool down.
In a skillet, heat the oil and fry the onions and garlic until soft. Add the mushrooms and keep on cooking, until soft. Mix the mushroom mixture with the potatoes. Adjust with salt.

Now it is time to make the dumplings!
Bring a large pot of salty water to a boil and add a few drops of oil to the water. Now start by rolling out the dough. Take a 2 cm diametre ball from the dough and roll it out to a flat disc. Place a teaspoon of filling in the middle of the disc and fold into half.  Continue until you'll have used up all the dough and all the filling.
Boil a few dumplings at the time. When they rise to the surface (it will take about 2-4 minutes), scoop them out and place them in a colander to drain.

Now you can serve them with sour cream or fry them in butter and onions. Enjoy!


Although I had already eaten Varenyky before, I had never tried the version with potatoes and mushrooms. The were great! Home made dumplings are just much better than the ones you buy :)

Love,

Raffi

Monday, 21 August 2017

Day 184: Uganda and Luwombo


Welcome back, Raffies!

Today we are starting the last two weeks of our challenge! It's been such a great adventure so far. I have learnt so much about what people eat on a daily basis in other countries. And fun fact, I now have even more things I would like to try and so much more to discover.

Anyways, today we are going to Uganda and we are making a traditional dish: Luwombo. It is steamed meat and vegetables with plantains. Doesn't sound like much, but it is actually wonderful.

The sauce turns out to be incredibly smooth, yet slightly crunchy due to the crushed peanuts. As for the meat, you'll mostly find chicken, but other types of meat are also used.

The Ugandan cuisine added to its own traditions, some Arab and British influence, creating something really unique. So let's get cooking!

The recipe I used today is simple, if you are great at making the packages of banana leaves to be steamed. Unfortunately, mine looked like an accident, so I didn't dare to share them with you :(

500 g chicken, cut into bite-size chunks
2 tbsp peanut oil
2 onions, sliced or chopped
1 c mushrooms, sliced
1 c peanuts, ground
4 tomatoes, chopped
1 chicken stock cube
3 plantains, peeled and cut into chunks
1 tbsp ground smoked fish (optional)
Banana leaves
salt
pepper

Start by frying the meat until brown. Remove from the pan and set aside. Add a bit of oil to the pan and fry the onions, until slightly caramelised - this will take about 5-10 minutes.
Add the mushrooms, tomatoes, chicken stock cube, peanut and the smoked fish. Cook until the sauce becomes smooth and dense. It might be that you have to add some water to it.
Put your banana leaves in hot water to soften them up. Place some meat and some sauce into them and fold them and tie them like a package. Repeat until all the ingredients are used up.
Take out your steamer, place your pockets in it and the plantains. Cover and cook for about 1 hour.
Remove the packages from your steamer and serve. Enjoy!


I liked the consistency of the plantain, that reminded me of mashed potatoes and the sauce, I am repeating myself, was just so incredibly smooth and lovely.


Love,

Raffi

Sunday, 20 August 2017

Day 183: Tuvalu and Tuvalu tuna


Tālofa, Raffies!

Welcome to Tuvalu! Today we are enjoying one of the few ingredients that are not imported on Tuvalu: fish!

Most ingredients are imported on Tuvalu. Usually, if the weather is kind, a big container ship comes to the island once a month and brings all that is needed.
Otherwise, you stick to the staple foods: coconuts from the backyard and fresh fish that you catch at sea and mostly eat raw.

Our dinner tonight is a simple recipe: Tuvalu tuna. This dish is a curry-like dish, which indicates the influence from Tuvalu's neighbours. It contains soy sauce, onions, curry powder and cucumbers.

The recipe I have used today is from the amazing Sasha Martin and her blog GlobalTableAdventures:

400 g fresh tuna
2 tbsp vegetable oil
1 onion, chopped
2 cloves of garlic, crushed
1 tsp ginger, grated
1 tsp red chilies
1 tbsp curry powder
1 can coconut milk
4 spring onions, sliced
1 cucumber, peeled and sliced lengthwise
3 tbsp soy sauce
rice to serve

Start by heating up the oil in a frying pan. Fry the onions until soft. Then add garlic, ginger and chilies. Add the curry powder and stir well. Cook for a couple of minutes, until fragrant. Now it is time to add the coconut milk. Stir and leave it simmering for a few minutes. Add the cucumber and the green onions.
Season with the soy sauce. Now it is time for your tuna. The cooking time will depend how raw or done you want your tuna to be. This will also depend on how fresh your tuna is ;)
Serve with rice, ideally some coconut rice. Enjoy!


The dish was lovely. It really made me want to visit Tuvalu once in my life. It seems such an interesting country. It is so small and has the shape of a ring! :)
As for the dish, it reminded me of curry and whenever I hear curry, I am all in for it!


Love,

Raffi

Saturday, 19 August 2017

Day 182: Turkmenistan and Sabzi Govurma


Good evening, Raffies!

Today we are going to Turkmenistan, a country I know very little about, apart from the fact that it is famous for its legendary melons. As a matter of fact, there are over 400 different varieties of melons growing in Turkmenistan! Cool, right?

It used to be the biggest exporter of melons during the USSR, but nowadays it lost a bit of its importance. However, I know all this, because I first saw the amazing Turkmen melons on a market in Riga and I was instantly dumbstruck.

Anyways, back to our dinner. To be honest, Turkmenistan is famous for its Plov rice, its Shashlik, fermented camel milk, dumplings and a lot of dishes similar to Russia, like Pelmeni. The Russian influence is very strong, due to the Soviet Union, this is why today's dish is not exactly a pure Turkmen dish. We are making a Herbed Lamb stew, Sabzi Govurma, that you can mostly find in Azerbaijan and all over Central Asia. We are obviously pairing our mutton with some nice Plov!

The dish takes some time to get ready, but the result will be totally worth it! Here is the recipe I followed:

300 g lamb, from the shoulder, cut in small cubes
salt
1 onion, roughly chopped
4-5 threads of saffron
125 g butter
6 c garlic chives (also Chinese chives or Nira. In the worst case scenario, julienned leek also works)
1 bunch parsley, leaves
3 tbsp estragon (tarragon)
1 lemon, juice
pepper

Start by rubbing the lamb with salt. Put the lamb and the onion into a casserole and cover with water (if you are in a hurry, you can use a pressure pot. In that case it will only take 20-25 minutes). Bring to a boil and then reduce the heat and let it cook on low heat for about 1 hour and 15 minutes.

Now remove the lamb and the onions. Set aside 1 1/2 c broth. Mix in the saffron and estragon.
With the remaining broth, you can make a nice soup. Don't just throw it away!

Heat the butter in a large frying pan. Once it starts bubbling and foaming, add the parsley and chives. Salt well and stir frequently to prevent from burning. Cook until it gets soft and dark green - about 5 minutes.

Place the greens into a bowl. Add some more butter to the frying pan and fry the lamb, until slightly brown. Season with pepper

Add the broth to the lamb, followed by the greens and the lemon juice. Mix well and simmer on low heat for about 20 minutes. Enjoy!


To be honest, I thought the picture on the recipe looked tasty, but the real deal was great! The meat was so tender that it melted on your tongue, The slightly lemony greens were lovely and the Plov worked awesomely with the whole dish!


Love,

Raffi

Friday, 18 August 2017

Day 181: Turkey and Menemen


Good evening Raffies!

Today we are going to Turkey! There are so many great dishes for Turkey that it was all but easy to pick one. I decided to go for something simple and stumbled upon Menemen.
This is a distant relative of Shakshouka..yay, more eggs!
Menemen is a traditional Turkish dish that can be enjoyed at any time of the day. It is basically scrambled eggs with onions, peppers, tomatoes, Sucuk (the Turkish salami) and Beyaz Peynir, a cheese similar to feta. If you want to have it for breakfast, you usually skip the onions and garlic.
Most of the times, it is eaten with some delicious freshly baked Turkish bread.

The recipe is incredibly easy and you will have a great result:

The ingredients are for 2 people - yes, there are a lot of eggs :)

2 tbsp olive oil
1 tbs butter
1 onion, chopped
3 Turkish green peppers, chopped (alternatively 2 green bell peppers)
1 tsp chili flakes
salt
4 large juicy tomatoes, chopped
5 eggs
1 clove of garlic, minced
parsley to garnish
Sucuk, sliced and fried
Beyaz Peynir
Bread to serve


Start by heating the oil and the butter in a skillet. Fry the onions and peppers with the salt and chili flakes until soft and aromatic - about 5 minutes.
Add the garlic. Cook for a few minutes before adding the tomatoes. Cook it until it gets a nice and dense consistency. The time might vary depending on how juicy the tomatoes are.
In the meantime, scramble the eggs in a bowl. Add them to the vegetables and mix well. Now it depends how you like it, but the eggs should still be moist and the dish should not dry out.
Serve in two bowls and top with the Sucuk and the Beyaz Peynir crumbled on top.
N.B. You can also add some oregano when you add in the chili flakes.
Garnish with parsley and enjoy!


It was great! I could totally see myself having this for breakfast. I particularly became a big fan of Beyaz Peynir. It was delicious! The eggs were still soft and juicy and mixed perfectly with the remaining ingredients.

Love, 


Raffi

Thursday, 17 August 2017

Day 184: Tunisia and Tunisian Shakshuka


Good evening, Raffies!

Today we are going to Tunisia and we are going to try a different version of Shakshuka. A few months back, we made the Israelian version of this dish. So, when I was searching for a dish for Tunisia, I got intrigued upon reading about the Tunisian version of Shakshuka.

In Tunisia, it is common to share this dish with everyone, placing the pan in the middle of the table and everyone scooping out with their pieces of bread.
So, let's try it, shall we?

The recipe is as simple as the Israelian version:

1 tbsp olive oil
2 red bell peppers, julienned
1 red onion, sliced
1 tsp cumin powder
1 tsp dried chili flakes
2 cans of 400 g diced tomatoes
salt
pepper
6 eggs
200 g Greek-style yoghurt
1 clove of garlic, crushed
2 tsp lemon juice
coriander leaves to serve
Ksra, North African bread

For this recipe, you can either use an oven or a cast iron pan.
Start by heating the oil in a pan. Fry the onions and the peppers until soft. Season with the chili flakes, cumin powder, salt and pepper. Cook for a few minutes then add the canned tomatoes and bring to a boil. Cook until the sauce thickened and has a nice consistency.
In the meantime, mix the yoghurt with the garlic and the lemon juice. Set aside, you'll be needing it soon.
Now you make six indents into the sauce and crack one egg in each of the indents. Be careful not to break the eggs while cracking them into the pan. Add half of the yoghurt mixture around the eggs. The other half of the yoghurt sauce will be served later with the dish.
Cook the mixture until the eggs are done.
If you are using an oven, heat it at 180° C, transfer the sauce into an oven proof form. Crack the eggs and add the yoghurt. Bake for about 15 minutes in the oven.

Sprinkle with coriander, adjust with salt and pepper. Serve with Ksra, alternatively, you can use some Turkish bread.


It was great! Lovely. I really liked this version too!

Love,

Raffi

Wednesday, 16 August 2017

Day 179: Trinidad and Tobago and Saheena


Good evening, Raffies!

Today we are going to Trinidad and Tobago. We are going for some deep fried treats: Saheena. These balls are made out of Dasheen, also known as Taro leaves, ground peas and flour.

Saheena is usually eaten as a snack or a light meal with some sweet chutney. You can enjoy these delicacies all over the Caribbean. The dish originated from the West Indian region and probably came over to the Caribbean with the immigrants. Now it is a widespread treat.

The recipe I used shows perfectly all the steps to take and it actually helped me out a lot when it was time to make the balls. I just went for a leap of faith. The recipe is actually quite simple:

6 dasheen leave, without stems *you can also use spinach or endive
1 tsp saffron powder
1 tbsp. baking powder
2 tsp. yeast
1 1/2 c split pea powder (I used a processor to make the powder out of the dried peas)
2 1/2 c flour
2 tsp. salt
4 tbsp green seasoning
2 c water
lime juice

Start by folding the leaves and cut them finely into a bowl. Add all the ingredients and mix well. Don't forget to add a bit of lime juice. Leave to rest for about 30 minutes.
In a frying pan, heat about two fingers of oil. Place a bowl of water next to your dough. Wet your hands and form some flat discs. Fry in oil until golden-brown. The water is important to be able to work the dough well, otherwise it might get sticky. The dough might appear a bit liquid, but just take a leap of faith and you will see the balls will turn out great!


If you are interested, there are actually two versions of this dish and I wanted to share the second recipe with you too. I would actually love to try the second one as well :)

I really like these deep fried treats. We ate them with some homemade mango chutney and they were great! Now I am actually really really full.

Love,

Raffi

Tuesday, 15 August 2017

Day 178: Tonga and Faikakai Topai


Good evening, Raffies!

Today we are going to Tonga. To be honest, my designated dish was octopus in coconut sauce. However, due to great unluck, I was not able to find any fresh octopus this week.
Therefore, I had to change plans and went for a funny sounding dessert: Faikakai Topai.

It is a quite simple recipe: steamed dumplings in a coconut syrup:

For the coconut sauce:
2 c raw sugar
2 c coconut cream

For the dough:
2 c flour
2 tsp baking powder
1 tsp sugar
1/2 c coconut cream
1-1/2 c water

Start by making the coconut sauce. In a saucepan, heat the sugar while stirring very well, until it melts. Be very careful not to burn the sugar. Now reduce the heat and start adding the coconut cream, one spoon at the time. Stir well and continue stirring until you get a caramel-like consistency. Remove from heat and set aside to cool down.

Bring a pot filled with water to the boil and start making the dough. Mix the flour, baking powder and sugar in a bowl. Add the coconut cream and the water and mix well. The dough should be slightly dry, but wet enough to come off the sides of the bowl. Now wet a spoon with water and start by scooping a spoonful of dough into the boiling water. The dough should come off the spoon, once this is dipped into the boiling water. This will be your test dumpling. Cook for about 10 minutes, remove, cut open and check whether it is done. Continue now with scooping a few dumplings into the hot water - don't scoop them in all at once, otherwise they might stick to one another!
Cover with a lid and cook gently for around 10-15 minutes. Now you can either cut the dumplings into smaller pieces or enjoy them like this. Serve warm and covered with the coconut sauce. Enjoy!


This dessert was unusual for me. The dough reminded me of Knödel, but the combination was great! The sauce was delicious, very creamy and with an intense coconut flavour. You can literally eat these lovely dumplings on end :)

Love,

Raffi

Monday, 14 August 2017

Day 177: Togo and Djekoume


Good evening, Raffies!

Today we have only another 20 countries to go..
Our stop tonight is Togo and its Djenkoume. We are continuing on our vegetarian days and are going to enjoy some cornmeal!

These cornmeal cakes are traditional Togolese side dishes. Usually, accompanied by some fried chicken or vegetables, these rice cakes are great!


The recipe is pretty simple and it won't take you long:

2 c cornmeal
4 cloves of garlic, crushed
1 onion, thinly chopped
1 tbsp freshly grated ginger
2 tbsp red palm oil
450 g canned tomatoes, chopped
2 tbsp tomato paste
4 c chicken broth or vegetable broth
salt
pepper

In a skillet, heat the red palm oil. Sauté the garlic, ginger and onion until soft. Add the tomatoes and the tomato paste while reducing the heat. Stir well and cook until the sauce thickens.
Remove some of the sauce to use as a dip for later.
Add the chicken stock to the skillet and whisk in the cornmeal. You'll nee a smooth mixture. Leave it to simmer, until it is thick.
You can now form balls out of it or serve it in scoops. Eat it while still hot with some grilled meat or grilled vegetables.


Although it was a very simple dish, I liked the pimped cornmeal. It worked well as a quick dinner.

Love,

Raffi

Sunday, 13 August 2017

Day 176: Timor Leste and Batar Da'an


Good evening, Raffies!

Today we are going East, East East. We are on our way to Timor Leste. We are going to the country that literally means East East, from the Indonesian and Malay word for "East", Timur, and the Portuguese word for "East", Leste. Funny isn't it? I wonder how they actually came up with this name.
Timor Leste has been a colony of Portugal for a long time, before being swallowed by Indonesia and regaining its independence not long ago, in 2002. Up to this day, Portuguese is widely spoken across the country.

The cuisine is strongly influenced by Portuguese cuisine, with dishes like Feijoada. A lot of vegetarian dishes are also found on the island, like today's Da'an.
The dish's name already tells you what it contains, since it means "boiled corn" in Tetum, the second official language after Portuguese.

Today's dinner will be pumpkin, corn, mung beans with rice. Simple right?
The recipe is as simple as the dish may sound:

300 g corn
100 g mung beans
500 g pumpkin, peeled and cubed
2 c water
2 tbsp olive oil
1 onion, chopped
4 cloves of garlic, minced
salt
pepper

If you are using dried mung beans, place them in water the night before and boil them before starting. For my recipe, I was lucky enough to find them canned.
In a skillet, heat the oil and fry the onion and garlic until soft. Add the pumpkin, corn and mung beans. Cook for a few minutes. Add the water and bring to a boil. Reduce the heat and let it cook for about 15-20 minutes.
Adjust with salt and pepper and serve with rice.


I must say that I wasn't too excited about this dish. I had expected something closer to Indonesian, Malay or Filipino cuisine. However, it was a nice and simple dish to cleanse after the intense week we just had. It was good not to have meat on the menu for once.


Love,

Raffi

Saturday, 12 August 2017

Day 175: Thailand and Larb moo


Good evening, Raffies!

Today we are going to Thailand! I have to be honest, there were a lot of different recipes I wanted to make for Thailand, but in the end I settled for an unusual salad: Larb.
Larb is one of the traditional foods in Laos and in the Isan region of Thailand, where you can find a lot of Laotians. It is a salad with minced pork, shallots, culantro (a sibling of cilantro), lime juice and chilies. Usually it is ate with sticky rice and green papaya salad.
It is essential that you add some toasted rice to the meat to give it a certain crunchiness. The traditional way of making Larb is to use minced pork, Larb moo, but you can also find duck or chicken mince, which I think would be also fantastic.

Before we begin cooking, Thai cuisine is usually a taste test cuisine, which means there are not exact amounts to follow. You have to use your own judgement and adjust the taste to your liking. Isn't that fascinating?


Larb is a pretty simple recipe, that you can make in little time and the result is amazing:

5 tbsp uncooked sticky rice
300 g minced pork
1 1/2 tbsp chili flakes
1 pinch sugar
1 tbsp fish sauce
2 limes, juice
4 shallots, sliced
5 spring onions, sliced
1 c culantro, leaves
20 leaves of mint

Start by toasting the rice (khao kua) in a pan. Stir it well to prevent it from burning and remove it from heat, once it is golden-light brown. It will smell slightly like pop corn. Now either turn it into powder in a food processor or do it by hand in a mortar. You will need a nice powder. Set it aside.
In a frying pan, heat some oil and cook the meat thoroughly until well done. Remove from heat and add a good heap of the rice powder. Mix well and add the chili flakes.
After mixing again, add the sugar, fish sauce, lime juice and stir well. Now it is time to add the shallots, spring onions, mint leaves and the culantro. Mix it well one more time and adjust the taste to your personal preference. Serve and garnish with some mint, Thai basil leaves, culantro and lime. Enjoy with sticky rice!


It was the first time in my life that I toasted rice and made rice powder out of it. The dish was great, as the recipe suggested, I squeezed in two limes, because I like it sour and it also made the dish juicier. It was great!

Love,

Raffi

Friday, 11 August 2017

Day 174: Tanzania and Mchicha


Good evening, Raffies!

Today we are going to Tanzania and we are enjoying some Tanzanian Mchicha,
This is a very traditional dish, usually a side dish, eaten with cornmeal, millet porridge or rice.
It consists of Mchicha, a type of spinach, peanut butter, curry and coconut milk.
A very simple and quick dish, with a delicious flavour.

The recipe is really easy:

500 g spinach
1 onion, chopped
1 tomato, peeled and chopped
1 tbsp curry paste
2-3 tbsp peanut butter
1 tbsp ghee
1/2 c coconut milk
salt

Wash and chop the spinach. Mix the peanut butter with the coconut milk.
In a skillet, heat the ghee and fry the onion and tomato. After a few minutes, add the salt and curry.
Cook until the onion is soft, but not burnt.
Add the spinach and cook for about 15 minutes, until the spinach is done.
Pour the peanut butter mix and stir. Cook for a few more minutes. Adjust with salt and serve with rice, ugali (a dish made out of cornmeal, millet flour, Sorghum flour and water, cooked until it gets a dough-like consistency) or samp (corn kernels smashed until it has almost the consistency of mealie, but not that fine).


I really liked it. I have eaten several dishes with peanut butter and spinach during my challenge and every single one has had a special taste. A great dish for a quick meal!

Love,

Raffi

Thursday, 10 August 2017

Day 173: Tajikistan and Qurutob


Good evening, Raffies!

My migraine is back to haunt me and I am writing this shortly before hitting the sack.
We are going to Tajikistan and we are going to enjoy its second most famous dish: Qurutob.

The first national dish is plov, which you can also find in Uzbekistan. Qurutob, however, is a merely Tajik dish. It consists of yoghurt sauce, bread, vegetables - usually some fried onions and tomatoes - and meat.

The name comes from Qurut, the dried salty yoghurt balls, that are dissolved in water. It is a very simple dish. It gives you the necessary nutrients to be able to walk your fields outside and tend to your animals, even in cold temperatures.

The Tajik cuisine is a very poor one, being Tajikistan one of the poorest countries in the world, its cuisine is equally scarce. Years of Soviet domain, followed by years of civil war, have not been kind on its cuisine.

There are not many recipes of Qurutob around. It is a dish that is shared in the family and eaten daily. It consists of the few ingredients that are to be found in the rough Tajik climate, yoghurt, bread and a few vegetables. In the cold winters, onions are the toughest vegetables that can withstand the blistering weather. You can occasionally add some meat or more vegetables, that grow once the summer spring is back.


If you want to make the dish yourself, you need time (and with my migraine, a great husband that helps you out, while you lay in bed). However, the wait is worthwhile.
The Fatir is a standard bread in Tajikistan which resembles a rough puff pastry and is dry and stodgy. Don't worry, it has to be like that.

For today's dinner, I followed the recipe from two amazing pages, that described the steps in detail and did a great job.

1. foodperestroika gives you an amazing step by step recipe for the whole dish, from the bread, to the yoghurt balls all the way to the final masterpiece.
2. hitchhikershandbook gives you a more Tajik approach to Qurutob.


As for the dish itself, it was very rich. We obviously ate it with our hands from the common plate. It was very filling, the flavour was really nice, especially the meat. To be honest, it was the first time ever, I made yoghurt balls out of plain yoghurt. That was a fun experience!

Love,

Raffi

Wednesday, 9 August 2017

Day 172: Taiwan and Oily Rice and Three Cups Chicken


Good evening, Raffies!

We are going to Taiwan today and we are going to enjoy two different dishes: You Fan and 3 cups chicken.
Taiwan is one of the countries I would love to visit someday soon. I have heard so much about its sights and its cuisine. One special dish I am looking forward to is the "rotten tofu". My Taiwanese friends at school in Japan told me so much about it.

Well, back to today's dinner. We are going for some oily rice, as it is translated and a three cup chicken.

For the You Fan, also known as Oily Rice, I followed this nice recipe:

250 ml water
6 tbsp light soy sauce
2 tbsp dark soy sauce
2 tbsp brown sugar
2 whole star anise
3 cloves of garlic, crushed
1 cm ginger, thinly sliced
3 c rice
6 shiitake mushrooms, sliced (ideally use fresh ones, if you can find them)
1 handful dried shrimps (optional)
200 g fatty pork belly, sliced (For my recipe, I skipped the pork and went for a vegetarian version of You Fan)
fresh cilantro, chopped for garnish

In a skillet, combine water, dark and light soy sauce, shrimp, star anise and bring to a boil. Remove from heat. Add the rice and leave to rest for 30 minutes. Now remove the ginger, star anise and garlic.
Slice the shiitake mushrooms and add to the rice. Add the oil and cook the rice. Serve with the cilantro and enjoy!

If you use the pork meat, add it at the beginning and boil it with the water and soy sauce mixture. Then remove it and set it aside. Add it again when you add the mushrooms.


For the Three Cup Chicken or San Bei Ji, I followed this recipe:

1/4 c sesame oil
1 tbsp fresh ginger, chopped
6 cloves of garlic
8 chicken legs
1/2 c rice wine
1/3 c soy sauce
1 tbsp sugar
1 c Thai basil leaves

Heat the oil in a wok until smoking. Add the garlic, chilies and ginger until crunchy. Add the chicken and cook for a few minutes on each side.
Now add the rice wine, soy sauce and sugar. Bring to a boil and then reduce the heat and let it simmer for about 15 minutes, until the chicken is done.
Add the Thai basil and serve with rice.


Both dishes were fantastic. The rice was amazing. It remotely reminded me of risotto. Simply great.
As for the chicken, the sauce is great and the chicken was juicy and flavourful. I am really looking forward to lunch tomorrow for the leftover rice.

Love,

Raffi